

Someone visits your website, reads about your services, and fills out your contact form.
The enquiry arrives in your inbox.
You open the message, copy the customer’s information into your CRM, assign the lead to a salesperson, and create a reminder to follow up.
This process works when you receive a few enquiries.
But as your business grows, manually handling every submission can create delays, duplicate records, and missed follow-ups.
Automated lead capture connects your website forms to your customer relationship management (CRM) system so new enquiries can be recorded, organized, and assigned without repeated manual data entry.
You can use it to:
- Create CRM contacts when visitors submit forms.
- Update existing records instead of creating duplicates.
- Assign enquiries to the right team members.
- Create sales follow-up tasks.
- Send appropriate confirmation messages.
- Track failed submissions and workflow errors.
You don’t need artificial intelligence to do this.
Many lead capture workflows use straightforward rules and existing software connections.
In this guide, you’ll learn how to automate lead capture from your website to your CRM, compare the available approaches, and build a practical example using WordPress, Elementor Forms, n8n, and HubSpot.
You’ll also get a field mapping example, lead routing rules, a testing checklist, and advice on what to monitor after launch.
What Is Automated Lead Capture?
Automated lead capture is the process of collecting customer enquiry information from your website and sending it to a CRM through a connected software workflow.
Instead of copying information manually, your website and CRM exchange the details through a built-in connection, webhook, or application programming interface (API).
For example, a customer might submit:
- Name: Alex Morgan
- Email: alex@example.com
- Service: Website Development
- Message: We need a new website for our business.
The automation can check the information, find or create the contact in your CRM, and assign the enquiry to the appropriate team.
Your salesperson then reviews the request and decides how to respond.
Manual vs automated lead capture
| Step | Manual process | Automated process |
|---|---|---|
| Receive website enquiry | Employee opens an email | Form submission triggers a workflow |
| Create CRM contact | Employee copies details | System creates or updates record |
| Check duplicates | Employee searches manually | Workflow checks existing records |
| Assign lead | Manager chooses owner | Approved rules select an owner |
| Create follow-up | Employee creates task | Workflow creates task |
| Track failures | Team notices missing information | System records errors and alerts staff |
Automation doesn’t remove the need for salespeople.
It reduces the administrative steps between receiving an enquiry and beginning a useful customer conversation.
How Does Website-to-CRM Lead Capture Automation Work?
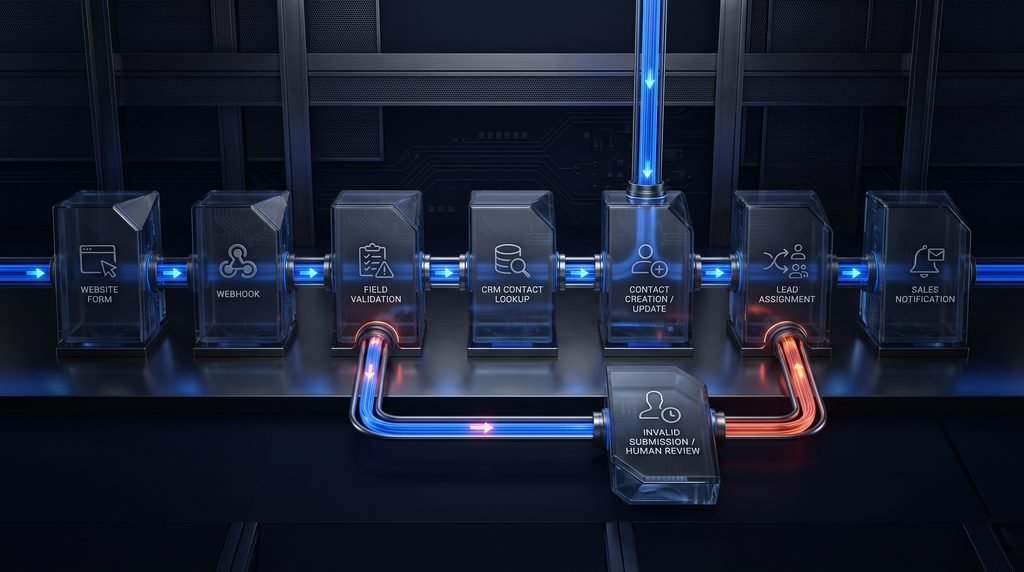
A typical workflow follows this structure:
Website form → Webhook or native connection → Data validation → CRM contact lookup → Create or update contact → Assign lead → Create follow-up task → Monitor result
Each stage has a specific purpose.
1. The website collects the enquiry
A visitor submits a form containing their contact details and the reason for their enquiry.
The form may also collect the relevant service, company name, or preferred contact method.
2. A connection sends the data
The form passes the submission to the CRM or an automation platform.
This can happen through a native CRM form connection, webhook, or API.
3. The workflow validates the information
The system checks required fields and basic data rules.
For example, an enquiry without a usable email address might need manual review.
4. The CRM checks for an existing contact
The workflow searches for a matching record.
If the contact exists, the system updates the appropriate information.
If no contact exists, it creates a new record.
5. The lead is assigned
Business rules determine who should handle the enquiry.
For example, website development requests might go to one team, while automation enquiries go to another.
6. The workflow creates the next action
The CRM may create a follow-up task, notify the salesperson, or prepare an approved acknowledgement.
7. The system records the result
The workflow records successful actions and errors.
If the CRM connection fails, the responsible employee should receive an alert.
A successful form submission and a successful CRM update are two separate events. Your workflow needs to account for both.
Three Ways to Connect Your Website Forms to a CRM
You don’t always need a separate automation platform.
The best approach depends on your website, CRM, and the actions you want to perform.
Option 1: Use a CRM’s Built-In Forms
Best for: Businesses that want a straightforward lead capture process.
For example, HubSpot lets you create forms that collect visitor information and create or update CRM records.
You can place a supported form on your website and configure available follow-up actions.
Advantages:
- Fewer software connections.
- Direct contact record creation.
- CRM-native form tracking.
- Less custom workflow maintenance.
Limitations:
- Form design may need to follow the CRM’s supported options.
- Advanced workflow features can depend on your subscription.
- Complex connections to other business tools may require extra setup.
If you only need to capture contact information in HubSpot, start by reviewing HubSpot’s form creation guide.
Option 2: Connect Website Forms Through an Automation Platform
Best for: Businesses using WordPress, Elementor, or multiple connected applications.
For example:
Elementor Form → n8n → HubSpot
The website form sends information to n8n, which validates the submission and performs approved CRM actions.
This approach can support custom routing, duplicate checks, notifications, and error handling.
Advantages:
- More control over workflow steps.
- Connections between several applications.
- Custom validation and routing rules.
- Options for error handling and monitoring.
Limitations:
- More setup and testing.
- Requires maintenance.
- Needs careful access and data handling controls.
For connected workflows across several applications, explore our n8n Workflow Automation service.
Option 3: Use Zapier or Make
Best for: Businesses that prefer visual automation tools and supported application connections.
A website form can trigger a workflow that creates or updates a CRM contact.
You can then add tasks such as notifications or lead assignment.
Advantages:
- Visual workflow builders.
- Many supported applications.
- Suitable for common lead capture tasks.
Limitations:
- Costs can grow with usage.
- Some actions require higher subscription tiers.
- Complex error handling may need additional configuration.
Which approach should you choose?
| Business requirement | Approach to consider |
|---|---|
| Capture website leads directly in HubSpot | HubSpot Forms |
| Keep an existing Elementor contact form | Elementor webhook and automation platform |
| Connect several business applications | n8n, Make, or Zapier |
| Use simple CRM-native lead assignment | Built-in CRM workflows |
| Add custom validation and routing | Dedicated workflow platform |
| Handle complex enquiries requiring interpretation | AI-assisted workflow with human review |
Start with the simplest approach that meets your requirements.
Step-by-Step: Automate Elementor Website Forms to HubSpot Using n8n

Let’s build an example workflow for a growing service business.
We’ll use:
- WordPress: The website.
- Elementor Pro Forms: The enquiry form.
- n8n: The workflow platform.
- HubSpot: The CRM.
- Email or team messaging: Internal notifications.
This is a demonstration architecture. The exact settings depend on your software versions, subscriptions, and hosting setup.
Step 1: Define the Lead Capture Process
Before opening any software, decide what should happen when someone submits a form.
For this example, the goal is:
Every valid website enquiry should create or update a HubSpot contact and reach the appropriate sales team with a follow-up task.
Define the required information:
| Form field | Purpose | Required? |
|---|---|---|
| Full name | Identify the customer | Yes |
| Email address | Contact and CRM matching | Yes |
| Phone number | Optional contact method | No |
| Company | Business context | No |
| Requested service | Lead assignment | Yes |
| Project message | Understand requirements | Yes |
| Marketing opt-in | Record a separate marketing choice | Only if offered |
Also decide which team handles each service.
For example:
- Website Development → Web Team.
- AI Solutions → AI Team.
- Business Automation → Automation Team.
- Other or Unknown → Manual Review.
Keep these rules simple for your first version.
Step 2: Build the Contact Form in Elementor
Open the page containing your enquiry form in the Elementor editor.
Select the Form widget.
Add the fields your business needs.
Use consistent field IDs, such as:
full_nameemailphonecompanyservicemessagemarketing_opt_in
Field IDs help you identify and map the information later.
Configure required fields and suitable validation.
If you offer a marketing subscription, use a separate, clear opt-in choice rather than treating a general sales enquiry as automatic permission for promotional messages.
Next, review the Actions After Submit setting.
Elementor Pro supports actions such as collecting submissions, sending email notifications, redirecting visitors, and sending data through a webhook.
For this workflow, add Webhook.
You can also keep an appropriate submission record or notification as a recovery option, subject to your data retention rules.
At this stage, you don’t have the final webhook address yet.
We’ll create it in n8n.
Official reference: Elementor — Actions After Submit.
Step 3: Create an n8n Webhook Trigger
Open n8n and create a new workflow.
Add a Webhook trigger node.
Configure it to receive a POST request.
Give the webhook a recognizable path, such as:
website-lead-capture
n8n provides a test webhook URL and a production webhook URL.
Use the test URL while configuring and checking the workflow.
When you’re ready to launch, activate or publish the workflow as required by your n8n version and use the production URL.
Your inbound endpoint must have appropriate protection. A difficult-to-guess URL alone isn’t a full security control.
Depending on your setup, you may need a supported authenticated connection, a protected server-side relay, request verification, and abuse controls.
Step 4: Connect the Elementor Form to n8n
Return to your Elementor form.
Open the Webhook settings under Actions After Submit.
Paste the n8n test webhook URL.
Save the page.
Open the live form and submit a test enquiry.
In n8n, inspect the received webhook data.
Check whether the submission contains:
- Name.
- Email.
- Phone.
- Service.
- Message.
- Any selected marketing preference.
Elementor’s webhook payload structure can vary with form configuration, including its advanced data setting.
Inspect the actual test payload before mapping fields. Don’t assume the values will arrive in a particular format.
Step 5: Normalize and Validate the Form Data
Add an Edit Fields or equivalent data preparation step in n8n.
Map the incoming values to consistent names.
For example:
| Incoming field | Normalized value |
|---|---|
full_name | Customer name |
email | Customer email |
phone | Phone |
company | Company |
service | Requested service |
message | Project enquiry |
marketing_opt_in | Recorded marketing choice |
You may also add:
- Form name.
- Submission timestamp.
- Website source.
- Campaign attribution values, where collected appropriately.
- A unique submission reference.
Next, add validation.
For example:
If the email is missing or invalid, stop automatic CRM creation and flag the submission for review.
If the requested service is missing, the workflow may still save the enquiry but route it to a manual review queue.
Don’t silently invent missing customer information.
Step 6: Connect n8n to HubSpot
Add the relevant HubSpot action or a supported HubSpot API request in n8n.
Connect the workflow to HubSpot using the appropriate authentication method and permissions.
Before creating a contact, decide how the workflow will identify existing records.
For this example, use the customer’s email address.
The process should be:
Search for matching email → Existing contact? → Update or create
HubSpot supports email-based contact deduplication, but your custom workflow still needs to handle matching records and API errors correctly.
Official reference: HubSpot — Deduplicate Records.
Step 7: Map the Form Fields to HubSpot
The information arriving from your website must match the CRM properties you intend to use.
Example mapping:
| Website field | HubSpot destination |
|---|---|
| Full name | First name and last name, when reliably separated |
| Phone | Phone number |
| Company | Company name property |
| Requested service | Custom requested-service property |
| Enquiry message | Approved note or custom enquiry property |
| Website source | Custom source-detail property |
| Marketing opt-in | Appropriate consent or subscription process |
Some fields may require custom HubSpot properties.
For example, you might create a property for the requested service.
Don’t overwrite existing customer information with blank form fields.
A full name may also need review if it cannot be separated reliably into first and last names.
For marketing permissions, follow the CRM’s consent and subscription features rather than assuming a simple custom checkbox is enough to authorize every type of email.
Step 8: Create or Update the Contact
Add the CRM action.
Use the result of the contact lookup to choose the next step.
If the contact exists:
- Update permitted fields.
- Preserve useful existing information.
- Record the new enquiry.
- Avoid creating a duplicate contact.
If the contact doesn’t exist:
- Create the contact.
- Save the relevant information.
- Record the source and requested service.
For an existing customer, a new enquiry may need a separate activity, ticket, or deal record rather than replacing the details of an earlier request.
Choose that structure based on how your sales team uses HubSpot.
Step 9: Assign the Lead to the Right Team
Now add lead routing.
You can use an n8n Switch node or equivalent conditional logic.
Example:
| Requested service | Assigned team |
|---|---|
| Website Development | Web Team |
| AI Solutions | AI Team |
| Business Automation | Automation Team |
| Other | Manual Review |
In HubSpot, owner assignment should use valid CRM user or owner identifiers.
If no valid owner is available, send the enquiry for review rather than assigning it incorrectly.
You may also apply rules based on location, existing account ownership, or service availability.
For a first workflow, service-based routing is usually easier to test.
Step 10: Create a Sales Follow-Up Task
Once the contact is saved and the correct owner is identified, create the next action.
For example:
Task: Review new website enquiry.
Owner: Assigned salesperson.
Due date: Based on the company’s approved response policy.
Related record: HubSpot contact or deal.
Use a supported CRM task action or API connection.
The workflow should not create repeated follow-up tasks when the same submission is processed again.
If the customer already has an open enquiry, you may want to update that activity instead.
Step 11: Send Notifications and Acknowledgements
An internal notification can tell the assigned salesperson that a new enquiry is ready.
Include only the information needed to take action.
For example:
New Website Enquiry
Service: Business Automation
Assigned team: Automation Team
Next action: Review the enquiry in HubSpot.
For customer communication, you might send an acknowledgement such as:
“Thanks for contacting us. We’ve received your enquiry and will review the details.”
This is different from subscribing the customer to a marketing campaign.
Only send messages that match the purpose of the enquiry and applicable communication permissions.
For a CRM-dependent acknowledgement, send it only after confirming that the required CRM action succeeded.
Step 12: Add Error Handling and Monitoring
A lead capture workflow must handle failures.
Common problems include:
- Missing form fields.
- Invalid email addresses.
- Duplicate submissions.
- Expired CRM credentials.
- Failed API requests.
- Invalid lead owners.
- CRM rate limits.
- Notification failures.
- Unavailable connected applications.
Add a way to record errors and alert the responsible employee.
For temporary failures, a controlled retry may be appropriate.
Avoid repeating a create action without checking whether the previous attempt already succeeded.
Store only the customer information needed for troubleshooting and follow your data retention rules.
Step 13: Test the Full Workflow
Test the process before using it for live enquiries.
Start with the n8n test webhook and sample submissions.
Confirm that the CRM record contains the correct information.
Check that the assigned salesperson receives the correct task.
Then test duplicate submissions, incomplete fields, and failed connections.
Once the workflow passes testing, activate it and switch Elementor to the production webhook URL.
Submit another controlled test through the live form.
Don’t consider the setup complete until you verify that the production submission reaches the CRM and creates the expected next action.
Example n8n Workflow Architecture
Here’s a practical structure for the workflow.
Webhook Trigger
↓
Edit Fields: Normalize Submission
↓
IF: Validate Required Information
- Invalid → Record error and notify staff.
- Valid → Continue.
↓
HubSpot: Search Contact
↓
IF: Contact Exists?
- Yes → Update approved contact fields.
- No → Create new contact.
↓
Switch: Requested Service
- Website Development → Web Team.
- AI Solutions → AI Team.
- Business Automation → Automation Team.
- Unknown → Manual Review.
↓
Create Follow-Up Task
↓
Send Internal Notification
↓
Record Workflow Outcome
This is a conceptual node sequence. Exact node names and available CRM operations can vary by n8n version and connection method.
For a reliable setup, include separate error paths and prevent duplicate actions when submissions are retried.
Practical Demo: A Website Enquiry Entering HubSpot
Let’s walk through a fictional example.
A visitor submits the following information:
| Field | Example value |
|---|---|
| Name | Alex Morgan |
| alex@example.com | |
| Company | Northstar Services |
| Service | Business Automation |
| Message | We want our website enquiries to enter HubSpot automatically. |
| Source | Website Contact Form |
Expected result in n8n
The workflow should:
- Receive the form submission.
- Check the required information.
- Search HubSpot for
alex@example.com. - Create or update the contact.
- Identify the requested service.
- Assign the lead to the Automation Team.
- Create a follow-up task.
- Record the result.
Expected result in HubSpot
The contact record should show the customer’s email, available contact information, and requested service.
The responsible team should have a follow-up task.
The original enquiry should remain accessible in the approved CRM activity or enquiry record.
What if Alex submits the form twice?
The workflow should identify the existing contact.
It should not automatically create two identical contact records or two identical tasks for the same submission.
What if HubSpot is unavailable?
The workflow should record the failure and alert the responsible employee.
The website should not claim that the CRM record was created when that action failed.
A suitable recovery process should allow the team to retry or enter the enquiry manually.
What Screenshots Should You Include in This Tutorial?
Real screenshots make a technical guide easier to follow.
For this article, capture the following from a demo environment using fictional contact information.
Screenshot 1: Elementor Form Fields
Show the Elementor Form widget with the name, email, service, and message fields.
Highlight the field IDs used for mapping.
Suggested caption: Elementor contact form configured to collect structured lead information.
Screenshot 2: Elementor Webhook Settings
Show the Actions After Submit section with Webhook selected.
Hide any private endpoint details.
Suggested caption: Elementor webhook action used to send form submissions to an automation workflow.
Screenshot 3: n8n Workflow Canvas
Show the workflow from Webhook through validation, CRM lookup, contact creation, routing, and notification.
Suggested caption: Example n8n workflow connecting website enquiries to HubSpot.
Screenshot 4: HubSpot Contact Record
Show a fictional contact with the requested service and follow-up task.
Remove real customer information.
Suggested caption: HubSpot contact record created or updated after a website enquiry.
Screenshot 5: Workflow Test Result
Show a successful test execution and the corresponding CRM result.
Suggested caption: Testing a website-to-CRM workflow before launch.
Use actual screenshots from your demo. An AI-generated interface should not be presented as proof that a live workflow ran successfully.
Website-to-CRM Lead Capture Testing Checklist

Before launching, test more than the successful submission path.
| Test scenario | Expected result |
|---|---|
| Valid new lead | New CRM contact created |
| Existing email address | Existing contact updated appropriately |
| Missing email | Submission flagged for review |
| Invalid email format | Validation prevents incorrect processing |
| Unknown service | Lead enters manual review |
| Repeated form submission | No unwanted duplicate tasks or records |
| HubSpot connection fails | Error recorded and staff notified |
| Invalid CRM owner | Lead routed to review |
| Customer declines marketing | No unauthorized marketing subscription |
| CRM update succeeds | Correct information visible in HubSpot |
| Follow-up task creation fails | Failure recorded and recoverable |
| Mobile form submission | Same expected workflow result |
| Production webhook test | Live form reaches the active workflow |
| Spam submission | Appropriate filtering or review |
Keep a record of your test cases and outcomes.
After launch, repeat the most important checks whenever you change the form, CRM properties, or automation rules.
How Much Time Can Automated Lead Capture Save?
Consider a fictional service business that receives 250 website enquiries per month.
Employees currently spend an average of six minutes per enquiry:
- Copying contact details.
- Checking for duplicates.
- Assigning the lead.
- Creating a follow-up task.
Before automation
250 enquiries × 6 minutes = 1,500 minutes.
That’s 25 hours per month.
After automation
Suppose employees spend one minute per enquiry reviewing the CRM record and checking the next action.
250 enquiries × 1 minute = 250 minutes, or approximately 4.2 hours.
Assume the team also spends two hours per month monitoring the workflow and resolving routine errors.
Total remaining work: approximately 6.2 hours.
Estimated time recovered
25 − 6.2 = approximately 18.8 hours per month.
At an illustrative staff cost of $25 per hour, that’s approximately $470 in monthly staff capacity.
Now consider operating costs.
| Item | Illustrative monthly value |
|---|---|
| Staff capacity recovered | $470 |
| Software and workflow operating costs | −$100 |
| Setup cost spread across 12 months | −$150 |
| Modeled monthly net value | $220 |
These are hypothetical figures, not typical industry results or a promised return.
Recovered staff capacity isn’t automatically a cash saving. The business must also account for software, maintenance, errors, and how employees use the time recovered.
What should you measure?
Track:
- Number of website submissions.
- Percentage reaching the CRM successfully.
- Average time from submission to CRM creation.
- Duplicate contact rate.
- Lead assignment accuracy.
- Failed workflow runs.
- Time spent on manual corrections.
- Follow-up tasks completed on time.
These measures help you determine whether automation is improving the actual lead management process.
Common Mistakes When Automating Website Lead Capture
1. Connecting the form without planning the CRM fields
A successful connection doesn’t guarantee useful customer records.
Decide where each field belongs before building the workflow.
2. Creating a new contact for every submission
Existing customers may submit multiple enquiries.
Use appropriate matching and update rules.
3. Overwriting useful information
A new form submission may contain fewer details than an existing CRM record.
Avoid replacing valid data with blank values.
4. Ignoring failed connections
A form can appear successful while a later CRM action fails.
Keep a recovery path and make errors visible.
5. Sending marketing emails without permission
A sales enquiry and a marketing subscription are different activities.
Record communication choices appropriately and respect applicable requirements.
6. Automating complex sales decisions too early
A workflow can assign a lead and create a task.
It shouldn’t invent a customer’s budget, guarantee a delivery date, or make an unsupported sales promise.
7. Using AI for tasks that need simple rules
You don’t need an AI agent to copy form information into a CRM.
Use ordinary workflow automation when the inputs and actions are predictable.
8. Forgetting maintenance
Form fields, CRM properties, team assignments, and software connections can change.
Assign someone to review the workflow regularly.
What Does Marketing Research Say About Automation?
HubSpot’s 2026 State of Marketing Report examines priorities and trends among marketing professionals.
Its accompanying research surveyed more than 1,500 marketers across industries, regions, and company sizes.
Among the priorities reported:
- 47.38% identified using automation.
- 48.57% identified using AI to create personalized content.
- 40.60% identified updating SEO for changes in search.
These are marketing priority figures, not estimates of CRM automation adoption or proof of higher conversion rates.
For a growing business, the practical question is what automation can improve in the customer journey.
Does every enquiry reach the right team?
Can salespeople find the information they need?
Are follow-up tasks created consistently?
Can staff identify and recover failed submissions?
A website-to-CRM workflow should address those problems before adding more advanced features.
Frequently Asked Questions About Automated Lead Capture
How do I automatically send website leads to my CRM?
Connect your website form to the CRM using a built-in connection, webhook, or automation platform. Configure field mapping, contact matching, and the actions that should occur when a form is submitted.
Can I connect Elementor Forms to HubSpot?
Yes. Elementor Pro supports webhooks, which can send form submissions to a workflow platform such as n8n, Make, or Zapier. The workflow can then create or update HubSpot records using a supported connection.
Do I need n8n to connect my website to HubSpot?
No. If you use HubSpot Forms, you can capture leads directly in HubSpot. Other website form tools may also offer supported CRM connections. n8n becomes useful when you need more control over validation, routing, or connections between applications.
How do I prevent duplicate CRM contacts?
Use a reliable contact identifier, commonly an email address, and check for existing records before creating new ones. Also prevent repeated submissions from creating duplicate follow-up tasks.
Can automated lead capture assign leads to salespeople?
Yes. A workflow can assign leads using approved rules based on service category, location, existing account ownership, or other available information.
Can I automate lead follow-up emails?
Yes, but the message should match the customer’s request and applicable communication permissions. An enquiry acknowledgement is different from promotional marketing. Personal sales conversations may still need human review.
Does website-to-CRM automation require coding?
Not always. Many forms, CRMs, and workflow platforms provide visual configuration tools. More complex workflows may need API knowledge, custom connections, or technical support.
What happens if the CRM connection fails?
A properly designed workflow should record the error, notify the responsible person, and support a controlled retry or manual recovery.
How much does automated lead capture cost?
Costs depend on your website tools, CRM subscription, workflow platform, setup requirements, and ongoing maintenance. Some businesses can use existing CRM features, while others need custom workflows.
How do I test website lead capture automation?
Submit test enquiries covering new contacts, existing contacts, missing fields, repeated submissions, incorrect routing, failed connections, and the production workflow. Verify the results inside the CRM.
Final Thoughts: Connect Your Website to Your Sales Process
Your website contact form shouldn’t be the end of your lead capture process.
It should connect to the system your team uses to manage customer relationships.
Automated lead capture can reduce repeated data entry, organize enquiries, assign leads, and create follow-up tasks.
But the most useful workflow isn’t necessarily the most complicated.
Start with a reliable form.
Map the fields correctly.
Check for existing contacts.
Define your lead assignment rules.
Add error handling.
Then test the entire process before launch.
Once the basic workflow works, you can decide whether to add reporting, marketing sequences, or more advanced lead qualification.
Explore CRM & Marketing Automation for Your Business
At Polaris Avenue, we help businesses connect their websites, CRMs, and sales tools through automated workflows.
Whether you use HubSpot, WordPress, Elementor, or other business applications, we can help you build a process that captures enquiries, organizes customer information, and supports your team’s next actions.
Explore Our CRM & Marketing Automation Service
Want to discuss your current website and CRM setup? Book a Strategy Call to explore a suitable approach.